

Millions of people use Microsoft Outlook but how many really make use of its features? The abundance of buttons and tabs can put some people off, it can seem confusing and complicated. But it’s quite brilliant, most people just aren’t using it effectively.
Here are 10 features that most people are unaware of, which have the potential to change your entire experience of Outlook:
1. Scheduling Emails
Sometimes I work late at night, but I don’t always want clients knowing that. You might have some news, a blog, or an article that you don’t wish people to know about until the next day, but you won't have time then to start sending updates. Outlook allows you to write an email and schedule when you want it to go out.
How: Once you’ve written your email, go to Options>Delay Delivery and tick the box that reads Do not deliver before, then enter the date and time you would like the message held until. Click close and then send your email. It won’t be sent prior to your specified time.

Pro tip: since May 2020 the same functionality is available with Microsoft Office 365 webmail.
2. React with Emojis
They say a picture’s worth a thousand words. There’s also plenty of occasions where you need to share an emotion rather than a message, and that’s where the new reaction feature can be really useful.
Say a colleague shares news about cake in the office, or sends out save the date about the latest social. Clicking on a quick heart or thumbs up acknowledges the message and gives your team member a happy little buzz, without any inbox spamming.
How: The reaction button’s conveniently right next to the “reply” and “forward” buttons in your inbox. Simply hover over the smiley face and choose from the options.
3. Create New Meetings, Appointments, Tasks and Contacts From One Window
If like me you find yourself switching between contacts, calendar and email frequently, then you’ll really like this feature. It allows you to create a new task or appointment without having to leave your inbox.
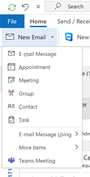
How: from your email home page click the drop down arrow next to the New Email button. Then you simply select which item you would like to add: a contact, meeting appointment and so on. You can also access the same list by right clicking on your Outlook Icon in your Start Bar.
Pro tip: Quickly create a new calendar appointment that includes the contents of the email by dragging the email onto the calendar icon in Outlook.

4. Send Similar Emails Quickly with Quick Parts
If you send similar emails on a regular basis, for example to invite people to an event, then Quick Parts allows you to save the text of the email (or parts of it). Then you can insert it into future messages. Plus, if you save it as auto text, then next time you start to write the same content, Outlook will suggest the remaining text for you and you can simply hit Enter to insert the text.
How: Once you’ve written your email, highlight the text you wish to save. Go to the Insert tab (top menu bar). Click Quick Parts, then Save selection to Quick Part Gallery. You can then give it a name for easy reference and in the Gallery drop down you can save it as Quick Part or as Auto text which will automatically suggest it next time you start to type the beginning of the sentence.
5. Accessibility Options
Immersive Reader can be extremely helpful both for employees with a disability and for those who simply prefer a more focused reading experience.
Selecting “Immersive Reader” from the three-dot menu on Outlook emails brings up a screen with the email copy in large text with fewer distracting tabs and buttons.
From there, you have the options to change the text, spacing, and screen colour to make it easier for you to read, or to select “text to speech” to hear the email out loud. You can also translate the email into your chosen language.
6. Keyboard Shortcuts
We love keyboard shortcuts and there are some handy ones to know for when using Outlook:
-
Switch to Mail: CTRL+1
-
Switch to Calendar: CTRL+2
-
Switch to Contacts: CTRL+3
-
Switch to tasks: CTRL+4
-
Make a new appointment: CTRL+SHIFT+A
-
Create a new contact: CTRL+SHIFT+C
-
Start a new message: CTRL+SHIFT+M
-
Send message: ALT+S
-
Reply to a message: CTRL+R
If you haven't used keyboard shortcuts before, we'd highly recommend learning a few - you'd be amazed how much they speed up your day!
7. View it Your Way
Most people use the default view of their inbox but there are other ways to view it which may suit you better.
How: in Windows, click the View tab (top toolbar) and then Change View. You should see a few preset views to choose from. If you wish you can go a step further then you can click View Settings, where you can add columns, sort emails, change the font and much more. Once you have the settings you’d like you can save the view.
8. View Messages Your Way
I really like this. You can custom the way that certain emails appear. For example, instead of bold, my unread emails are Green. Even more useful is that any emails that contain a certain word (in the title or body) are blue. This really helps me when I’m looking for particular emails. For example we organise an event called Tech Talks, I can see relevant emails to the event at a glance which is extremely helpful.
You could have emails from your boss in a bright colour to make sure you spot them, or emails where you're only copied in (rather than addressed directly) in a lighter colour.
Pro tip: you can do the same with calendar appointments, for example, turn all the Microsoft Teams online meetings purple and all the meetings with your boss a bright red!
9. Sharing Calendars
Sharing calendars can save time and make for better teamwork. At SpiderGroup most of us have access to at least one other person in the office, while many of us share access to our calendars with everyone. It's useful to see what availability people have, especially when you need to book a meeting!
How: To share your calendar with someone go into your calendar and click Share Calendar. Enter the contact you wish to share your calendar with. In the details drop down menu you can select whether you want them to see availability only or full details (you can still lock personal appointments if you wish) - or even if you want them to be able to put items directly into your calendar. Finally click Send. The Recipient accepts your request and will have access to your calendar.

10. Enhance your Collaboration Capabilities
We’ve all got used to the modern miracle of being able to collaborate with colleagues on documents and excel sheets in real-time. Now, more of that capability’s been brought to your inbox.
Microsoft Loop is at the cutting edge of Microsoft developments and Loop Components are the first feature of the app available in Outlook (specifically 365 and the web-based version). These are items embedded in emails or calendar items which you and your team can edit together in real-time, without sending more emails back and forth - cool or what?
Insert a table, checklist, Q&A boxes, or a task list and make sure everyone’s on the same page. If you want to refer component after you’re finished with an email session, you can also move it to Teams Chats or link it to more people, and they’re saved automatically on the OneDrive.
How: To create a new Loop Component in a message, simply go to the “message” menu, click on the Loop Components Icon, and select the type you’d like from the list.
11. Effective Task Management
Tasks are definitely among the items that are seriously under-used. Similar to calendars, task lists can also be shared. Even better you can actually delegate tasks to people in your team. This is great if you’re working on a project with one or more people, because you can assign certain tasks to certain people and get notified of when they are complete. Everyone can see how close to completion they are and if any are yet to be started.
How: First create a task (Task > New Task). Enter as many details as you wish: subject, start date, due date, status and so on. On the menu bar select Assign Task and put the name of who you would like to assign the task to and click Send. The recipient can accept or decline the task, and you’ll get notified of their response. If you also ensure both boxes are ticked when you send the task you’ll keep an updated copy of the task on your task list and you’ll also get a status report when the task is complete.
Pro tip: Microsoft Office 365 includes the 'To Do' app, this automatically includes any tasks you have in Outlook but also flagged emails and Planner too! All your tasks in one view with the ability to schedule and organise them.
12. Creating and Managing Rules
The rules element of Outlook helps you to prioritise and organise emails to suit you. Examples of what you can do include: having emails from a particular person going to a separate folder. You might want newsletters to go to a ‘read later’ folder for when you have some quiet time.
You might want to permanently delete emails from a particular person, (that certain someone who sends blanket emails that you cannot unsubscribe from, perhaps). You can forward certain emails to someone else on the team or have folders specific to certain projects. You can also have an alert sent to your phone if you're waiting on something urgent for example.
How: To manage and create new rules you go to Rules>Manage Rules & Alerts>New Rule. From here you can select the type of rule you want to apply then click Next to add more details such as whether its a rule for certain people or subjects, click Next again and add the details of what you want to happen to those emails. You can change the rules at any time by following the same process without clicking New Rule.
Pro tip: Using Microsoft's Power Automate feature of Office 365 (AKA Flow) you can add some clever automation to your emails, for example, if you get the daily office cake selection to your inbox you could create some automation to share it with the rest of your office via Microsoft Teams.
13. Search
Gone are the days of having to partition out all your emails into separate folders so you have any hope of finding them again. The search feature in Outlook has improved a great deal and can help you find any content based on only a few words.
How: You can just type your search criteria into the search bar at the top of your Outlook window, but if you want to get to the right result quickly, here are some top search tips:
-
add 'from:' or 'to:' before your search to find emails from a specific person
-
If you're after an email attachment try adding 'hasattachment:yes'
-
looking for that elusive email you know arrived yesterday, try 'received:yesterday'
-
If you're running out of space in your inbox you can find all the large emails by searching 'messagesize:enormous'
-
Just want to see all the emails you've not found the time to read yet, try 'read:no'
14. Easier Scheduling
Trying to find a time for a meeting used to be a nightmare. Features such as calendar sharing made it easier, now scheduling polls integrated directly into Outlook means it only takes a couple of seconds (as long as everyone’s Outlook calendar is up to date).
When you send out the initial email about the meeting, simply make sure you have everyone you want to include in the meeting as recipients and select “scheduling poll” from the “insert” tab. Once you select the length of the meeting and the dates you’d like it to be on, this will automatically list all the times everyone required for the meeting is available. Choose a couple of different time options to be safe, and send!
15. Quick Bookings
I’ve found this new tool is a bit of a gamechanger when it comes to booking one to ones with your team or sales meetings with potential clients. BookingsWithMe allows you to set up public and private office hours where your team, or anyone with a link if your hours are public, can book themselves in for a meeting with you.
You can pre-set the length of meeting they’re allowed to book and where the meeting takes place (whether that’s over a Teams call or, in your office, or at a local cafe) as well as the buffer time you’d like between meetings. The extension even creates an attractive public bookings page, so those outside the business can select the type of meeting they’d like to have with you from the options you present.
You can do this through the “create booking page” option on the left of your Outlook Calendar.
These are just some of our favourites but if you want to know any more Microsoft 365 tricks of the trade or need help with any of the above, feel free to get in touch.

Note: This article was updated from the original version published in June 2020.
.png)
.png)
